Knowledge
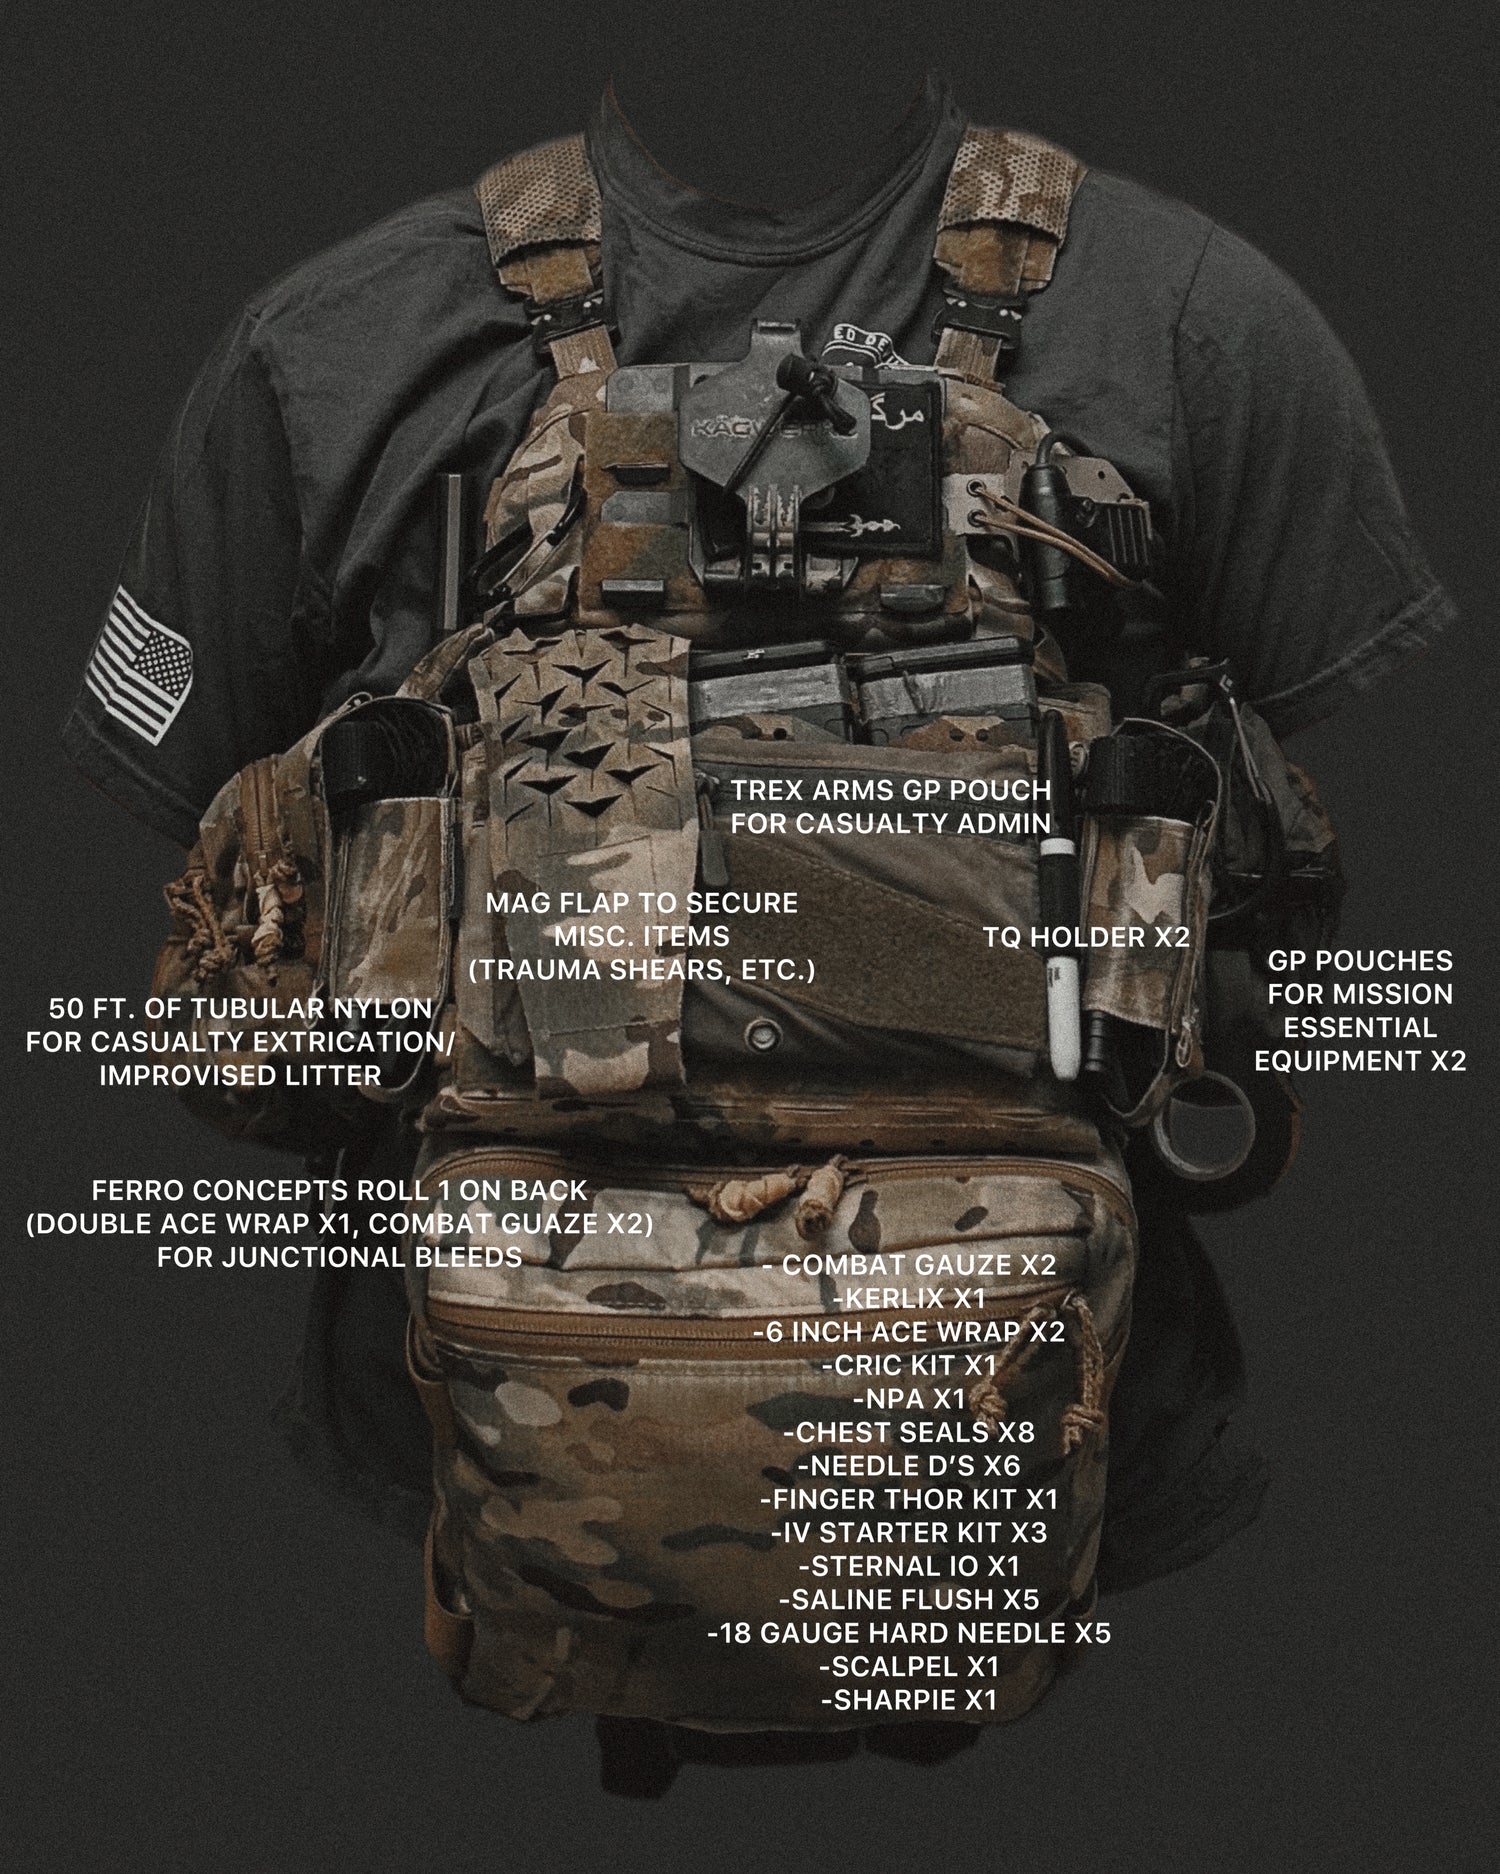
Medical Loadout
This particular load out is showcasing a kit that can be worn by an individual with extra medical training that can aid in the triage or treatment of casualties, while primarily being an assaulter. The idea is to cross load some medical equipment to either a belt or dangler. This allows you to work a casualty faster and provide life saving interventions without having to drop your aid bag. This is commonly called a "M.A.R.C.H Belt". In this example a dangler is used
to carry the medical equipment. Commonly this will consist of: M- Tourniquets, gauze, ace bandages. A- Airway adjuncts, Advanced airways such as a Cricothyrotomy kit.
R- Chest seals, Needle decompression, finger thoracotomy kit. C- IV starter kits, FAST1 Sternal IO, flushes, 18gauge hard needles. With the addition of diagnostics such as pulse oximetry, and ETCO2. As well as documentation such as a casualty card, MASCAL card, blood matrix, etc... What you are carrying will obviously reflect your scope of practice.
The purpose is to increase your efficiency and speed by having quick access to treatments that would otherwise be in your aid bag.
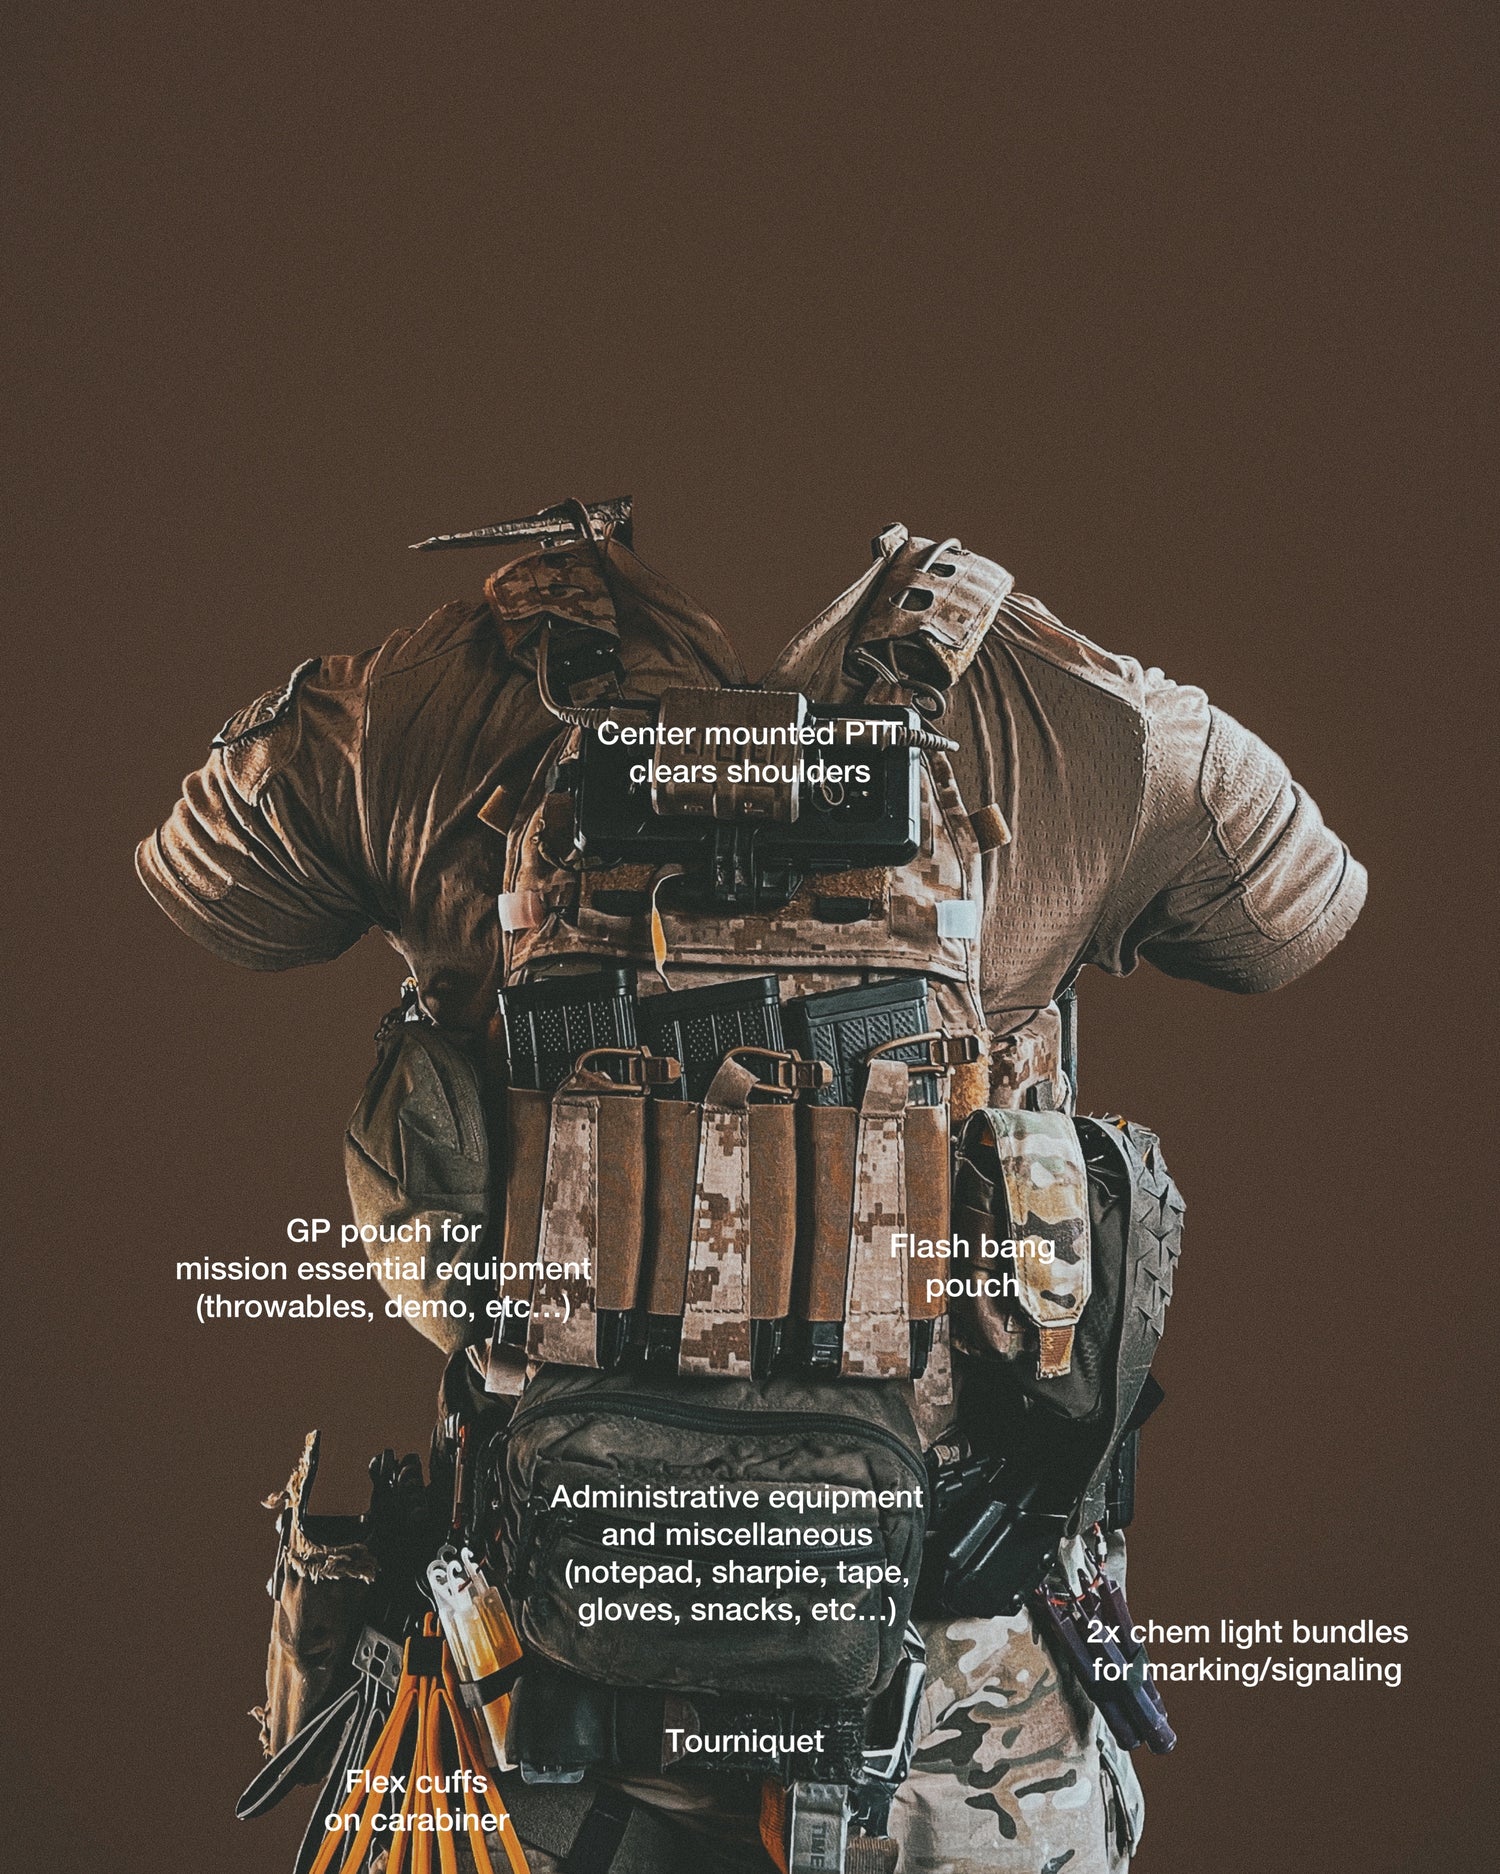
Assaulter Loadout
As an assaulter you are essentially a rifleman. You may not be carrying a special weapon system and may not have a special role within your element. With that being said, our philosophy on an "assaulter loadout" is all about versatility.
You should be able to carry any special equipment (breaching tools, demo, munitions, medical, etc...) for your team without having to alter your kit. Having to continually change pouches for several mission sets, it takes time and can be frustrating. A good solution is utilizing general purpose pouches and a back panel to carry any tools your team may need. Staying away from specific pouches and developing a very general purpose kit allows you to carry a wide variety of special equipment. The intent for this set up was to be as slick as possible to ensure the individual is as light and agile as possible. Staying light and not carrying any unnecessary equipment should be the goal however you need to have what you're supposed to have.
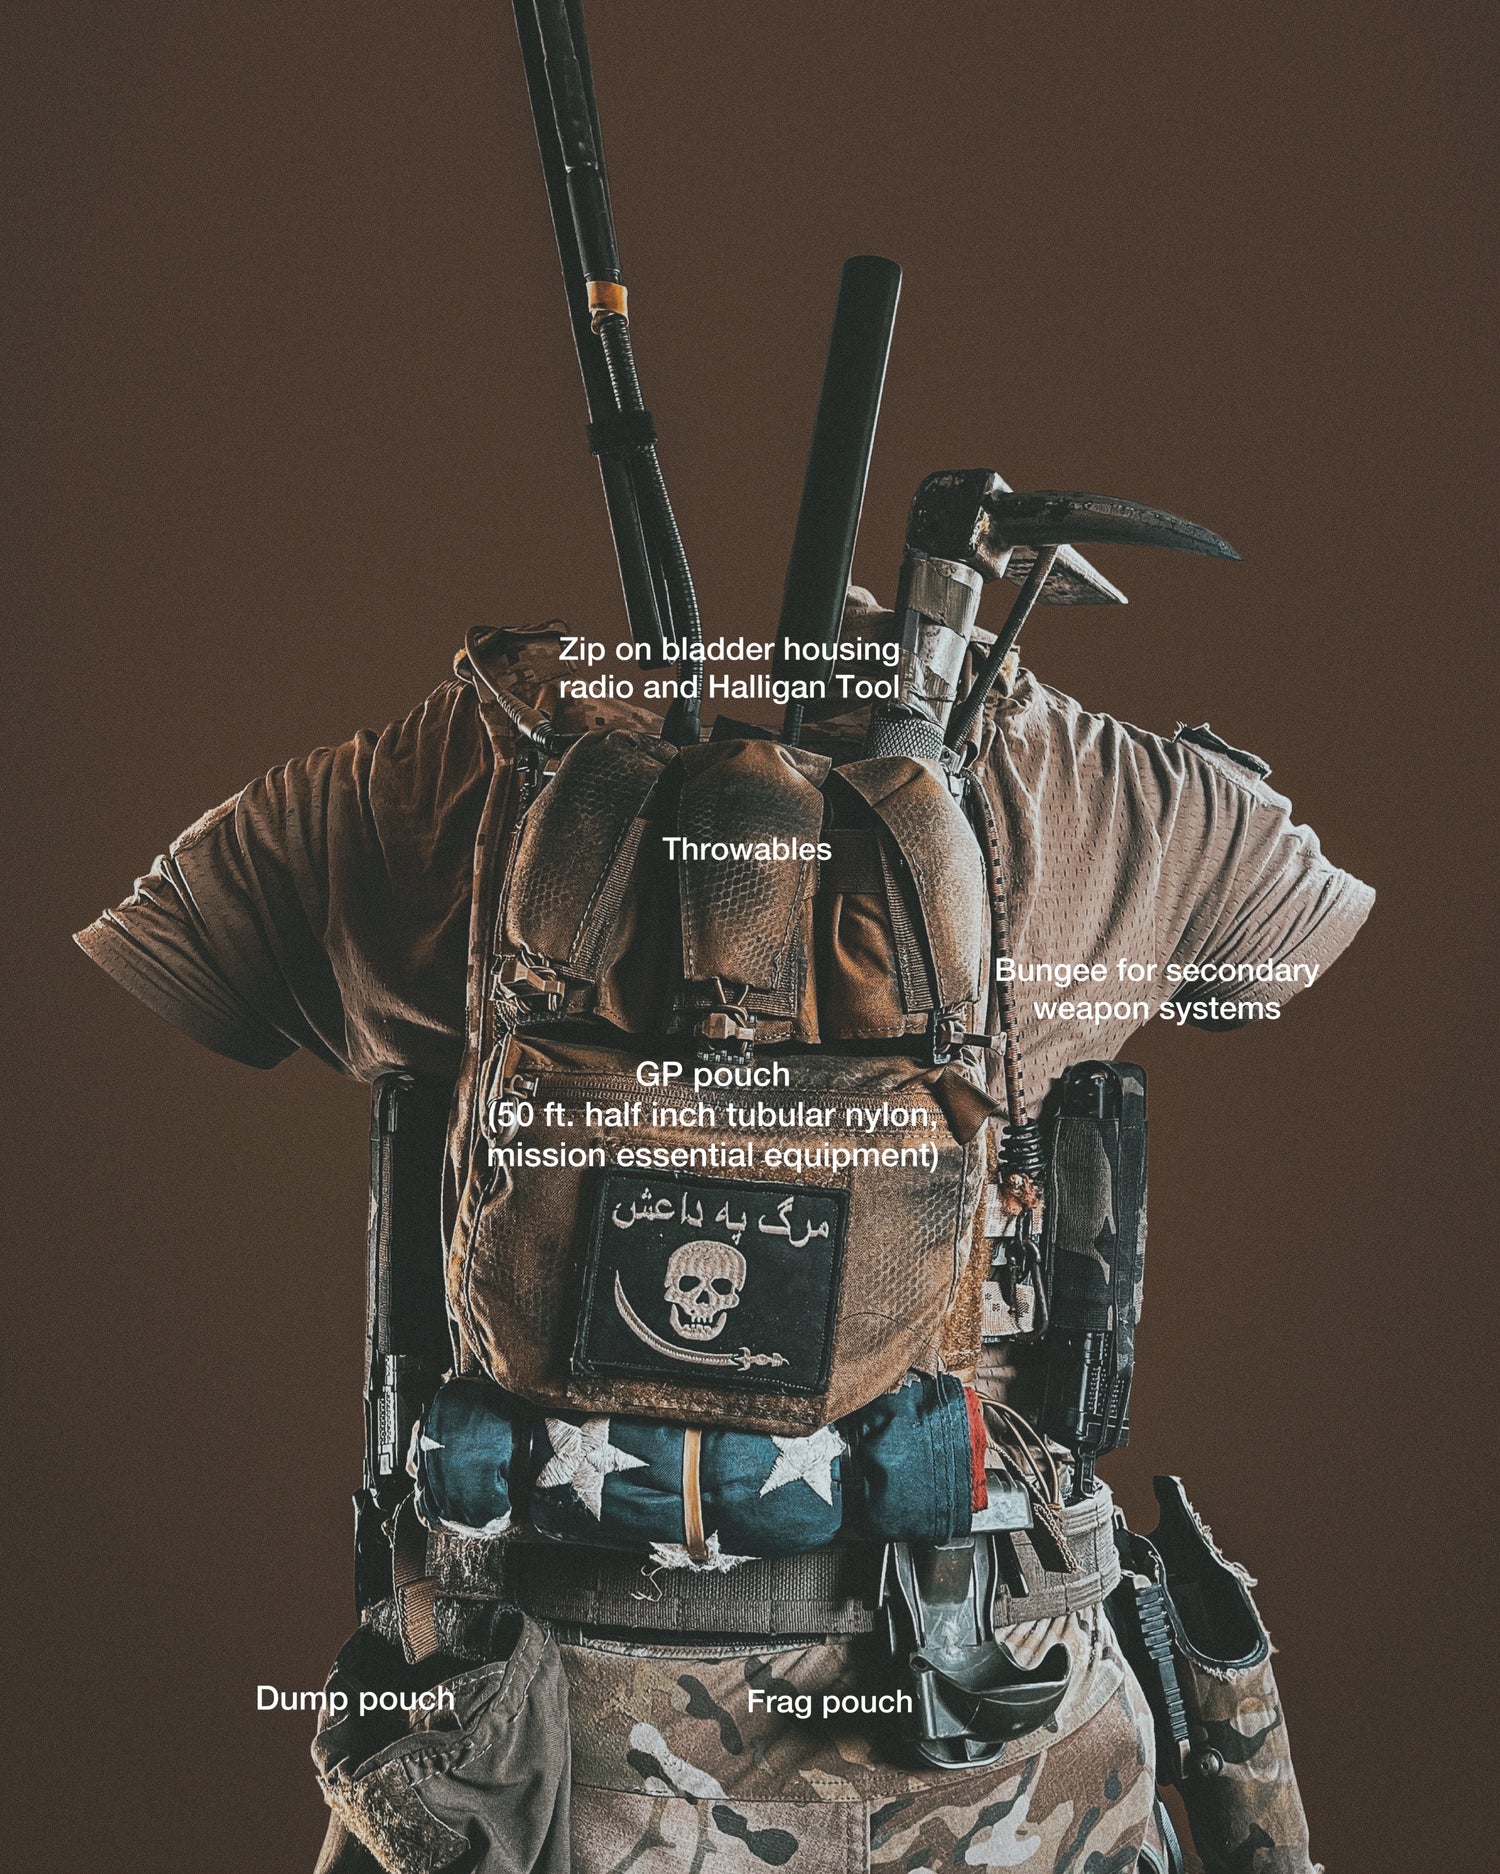
Here you can see this individual prefers to have their radio on their back to free up the front of their kit. With the proper equipment they can still completely manipulate their radio. Running the radio in the front is fine but this way you avoid having antennas in your face, using re-routers, or losing general real-estate that could be used for other equipment. You can also see this individual is running his breaching tool in the bladder pouch manufactured by Ferro Concepts.
They have retained it with a bungee cord that is secured through the
MOLLE inside of the back panel (pictured below). There is another bungee that is secured to the bottom of the cummerbund that is used for retaining a shotgun if they decide to use one.
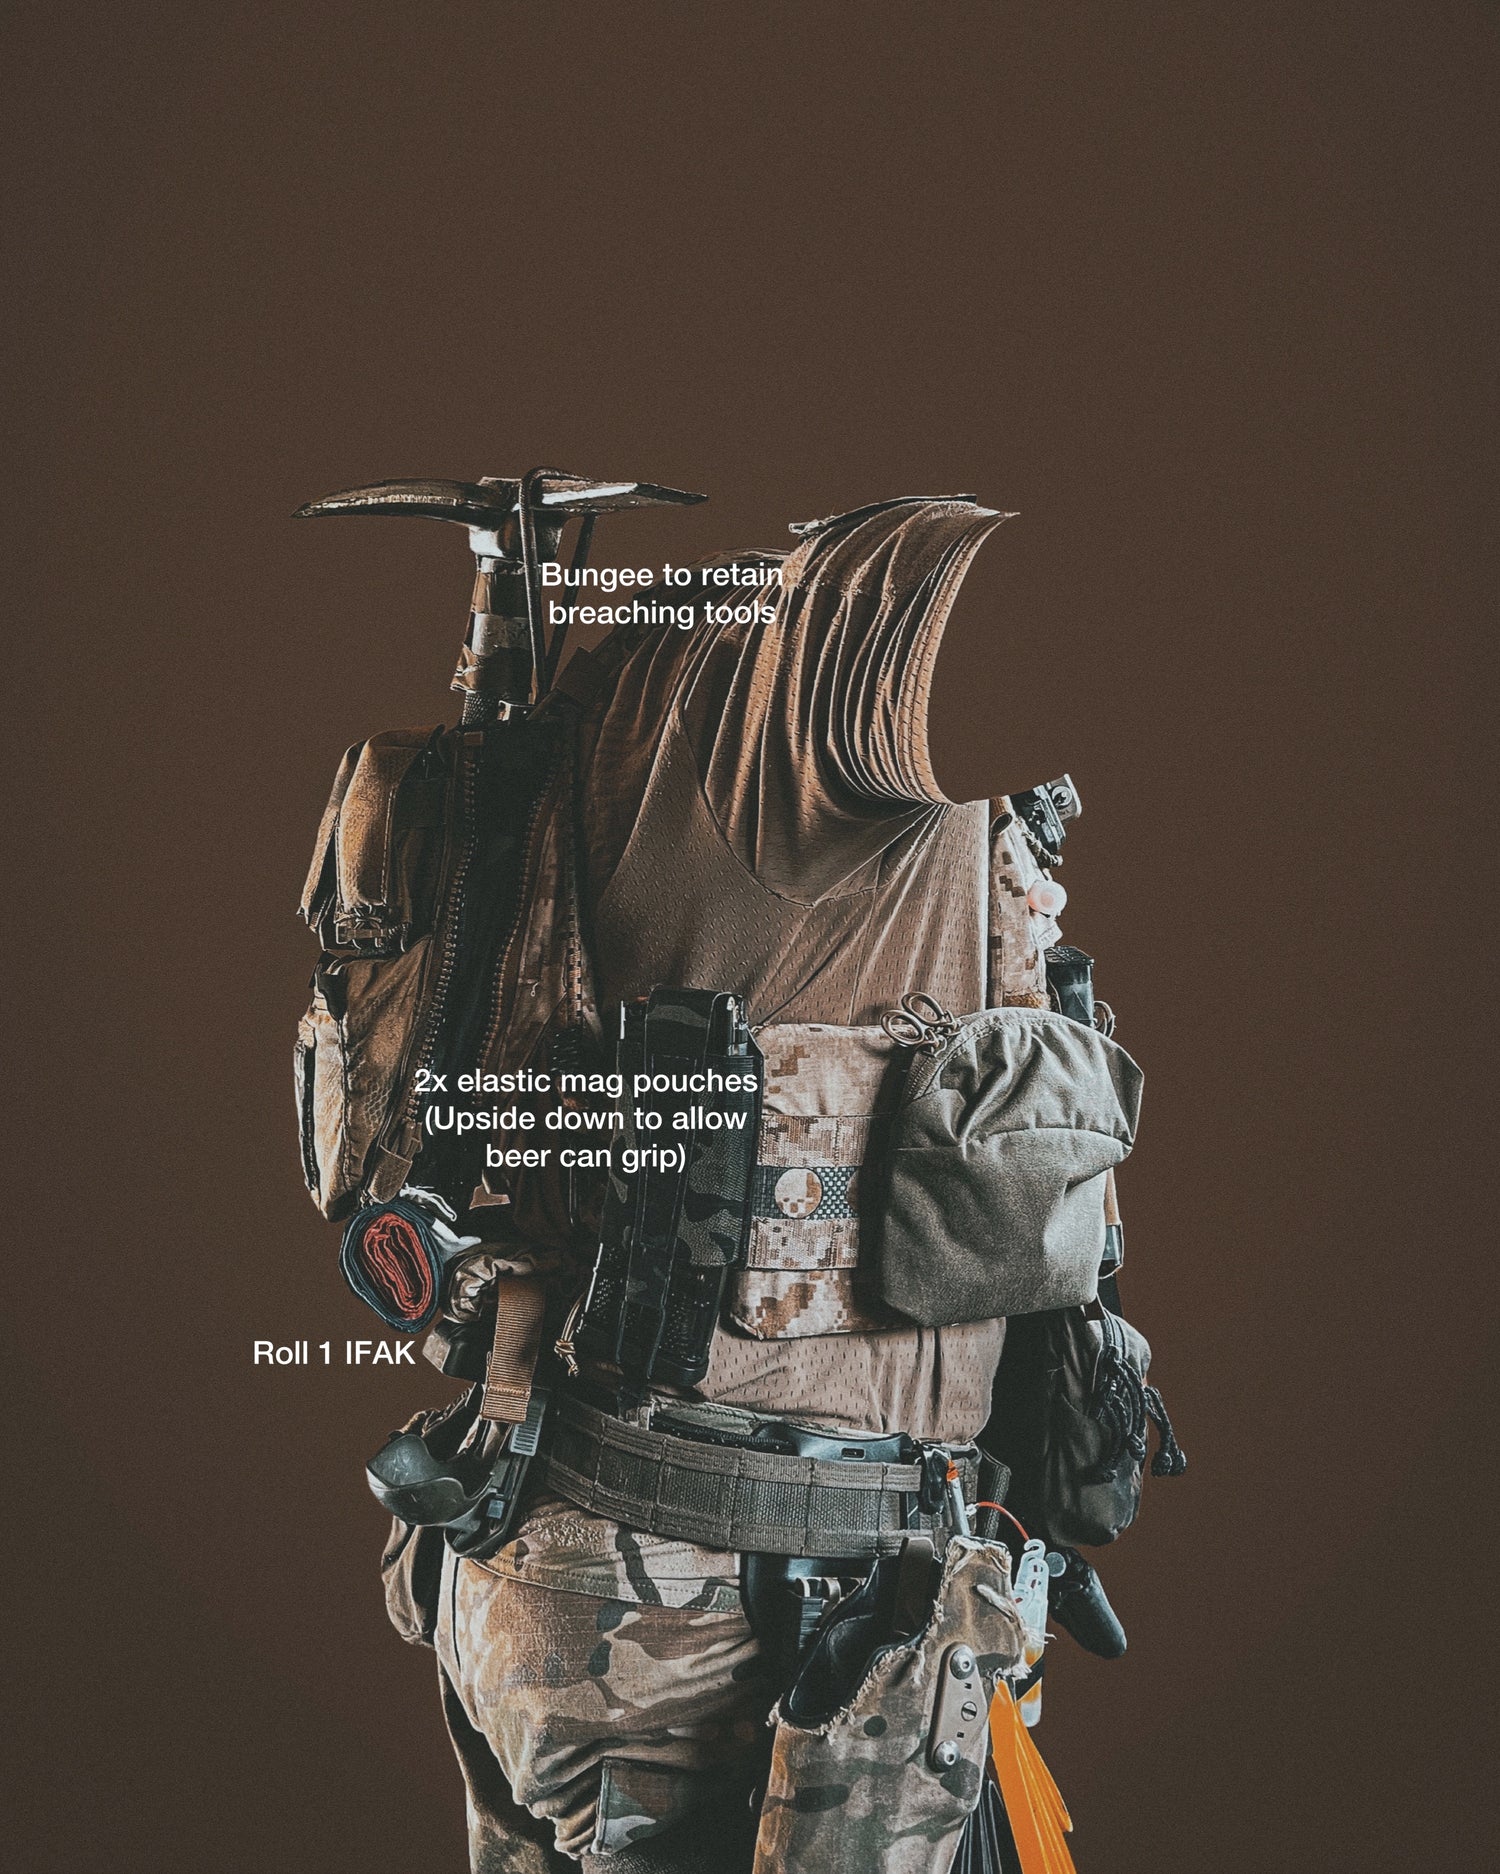
From this angle you can again see the bladder pouch that holds the breaching tool and the bungee that retains it. The next thing you see here is an upside down mag pouch designed by Ferro Concepts. A little unorthodox for sure, however there is a reason for it. Not every reload needed to have a shot timer to start it, again keeping the kit slick and placing equipment where you can reach it in a timely manner is important to some. This individual carries 5 magazines very accessible, one in the rifle, three on the chest, and one on his belt. There are two on his sides, one on his right and one on his left (pictured below). They are upside down so he can position his hand to actually pull them out of the magazine pouch, if they were right side up he cannot position his hand in a way to pull them upwards and out of the magazine pouch. This may not be the way for everyone but for this person it has worked great. Also pictured here is a Ferro Concepts general purpose pouch.
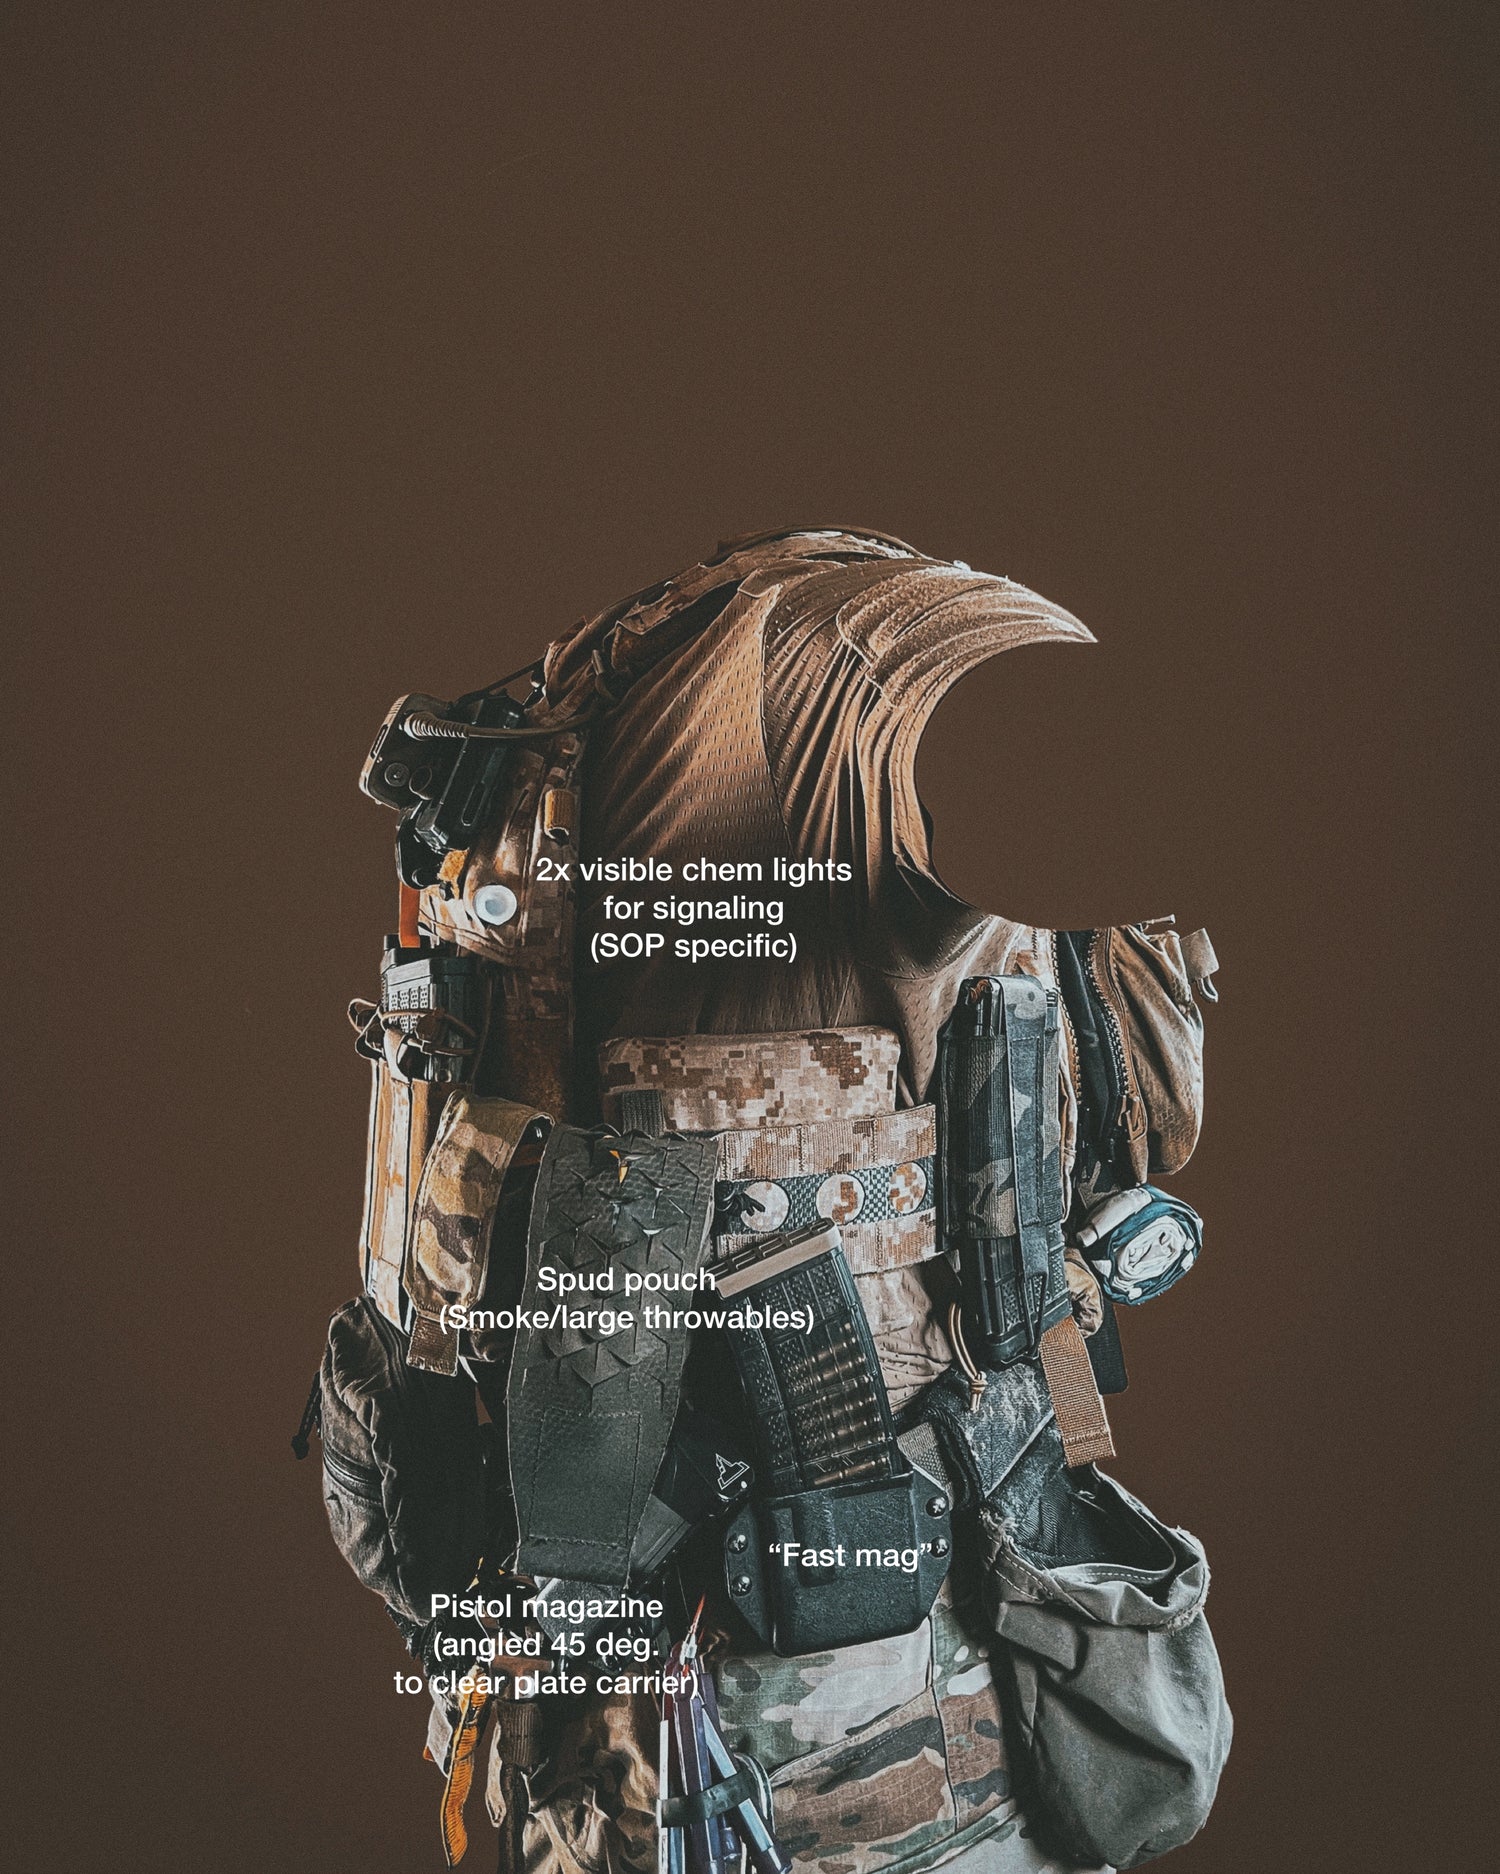
On the left side you can see a flash bang pouch to the left of the Spiritus Spud pouch, and then of course the Spud pouch. The Spud pouch is great for a variety of throwables or other equipment due to the cuts on the top of the flap that securely wrap around the object.
Notice on both sides of this kit set up the individual wanted to leave a small space free of any gear or equipment. This is so their arms can have room to move or hang without raising their arms and making them even more uncomfortable.
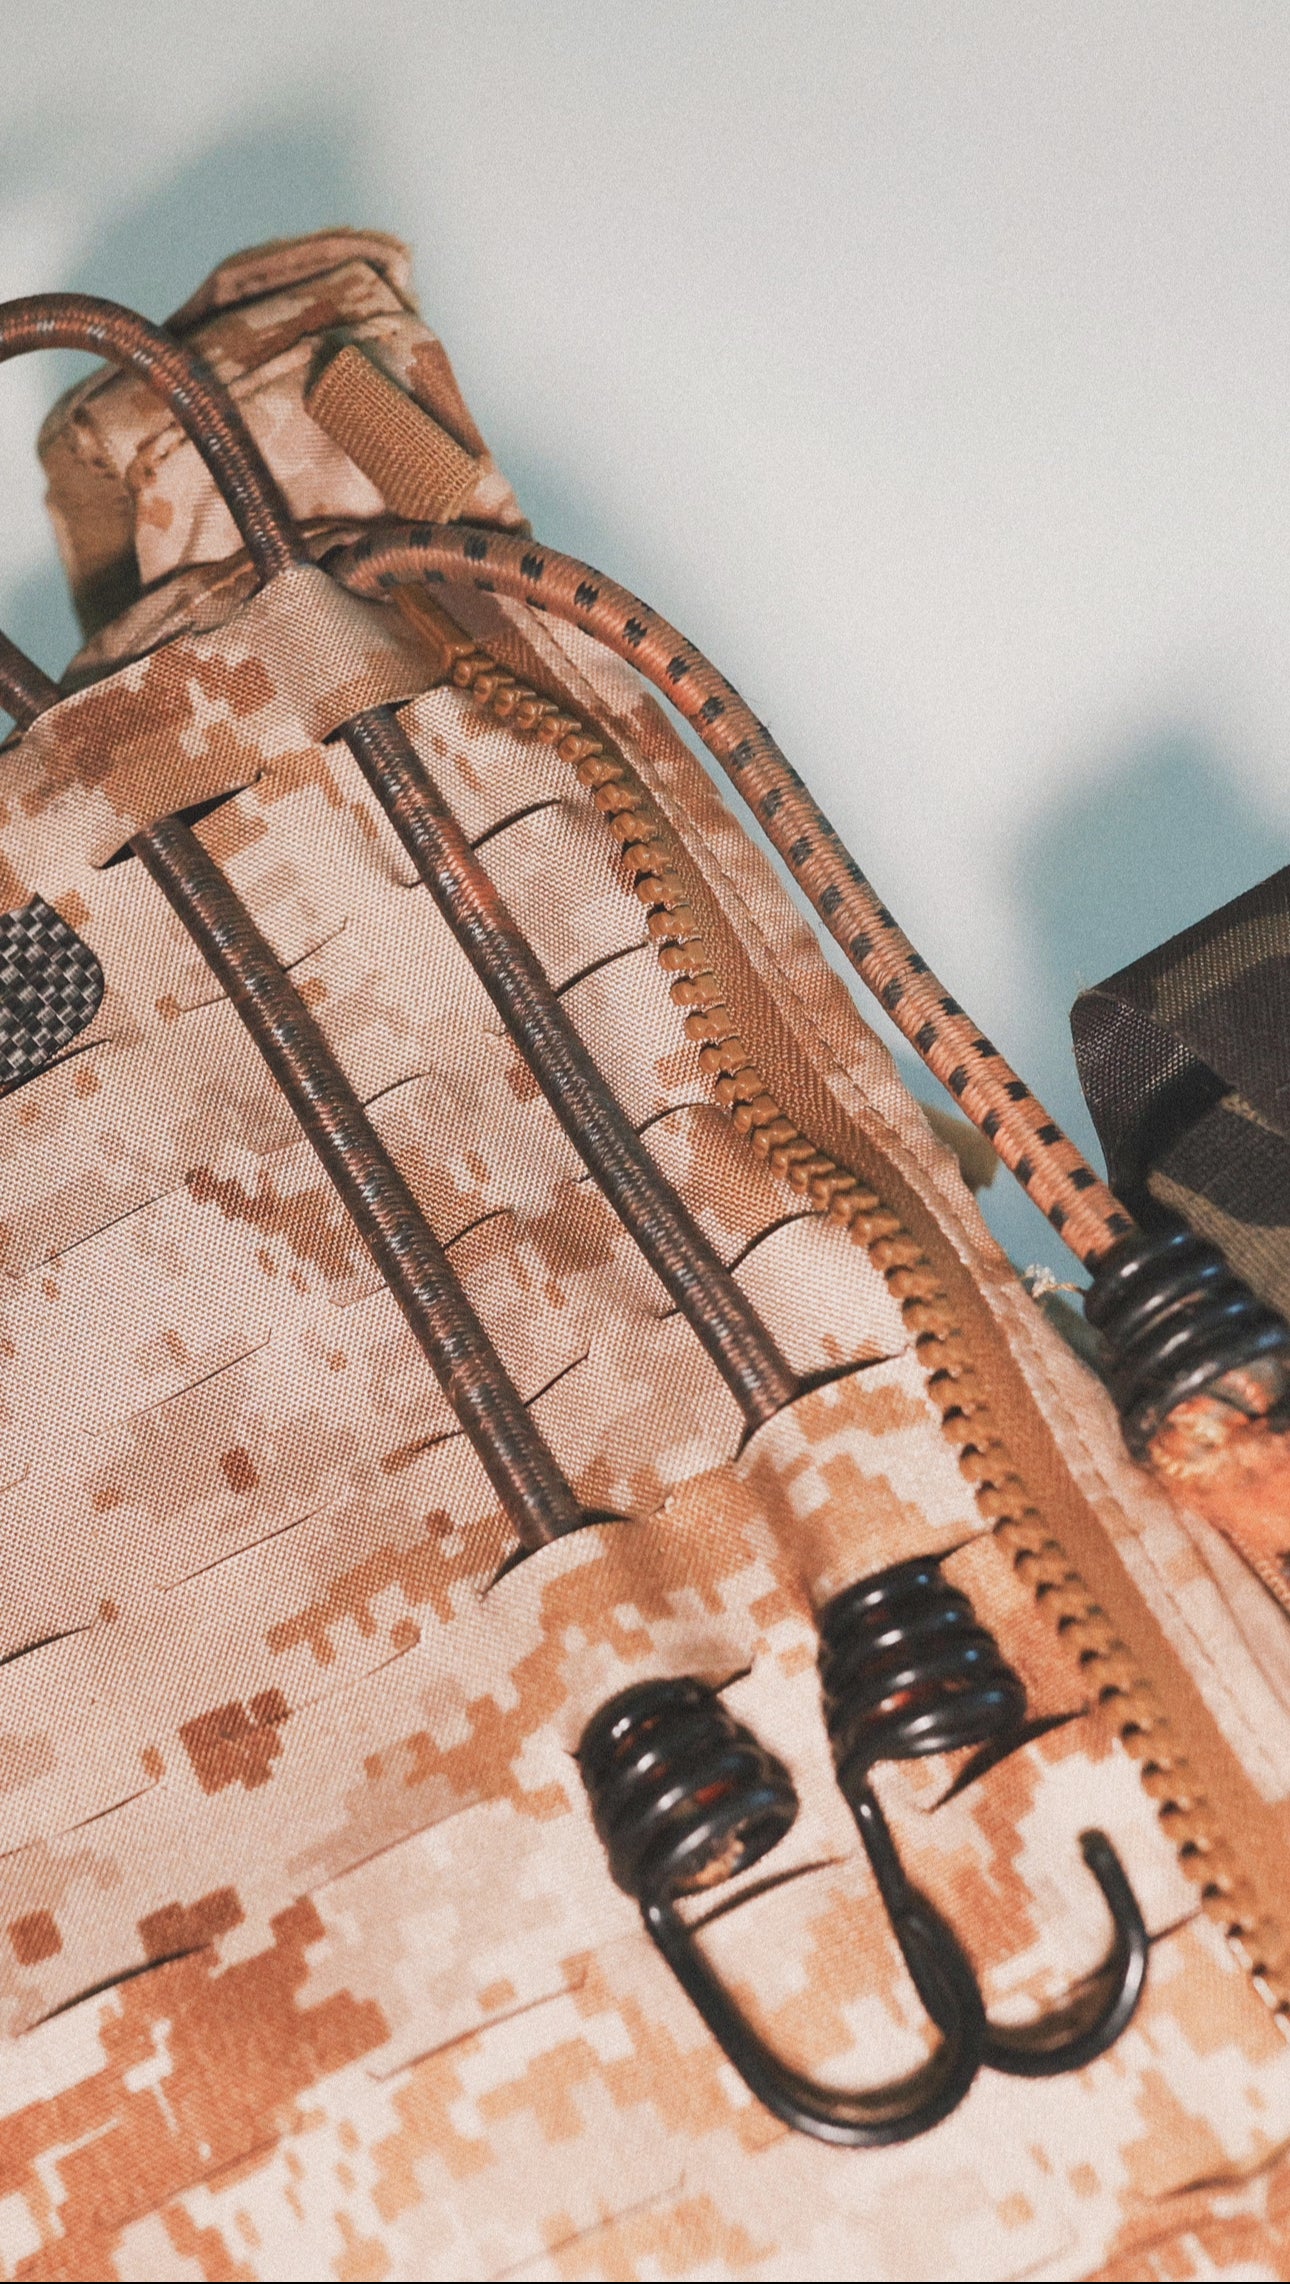
Retention for breaching tools
Retaining equipment is obviously a must however there are not many options in terms of retention for those tools. This is not a product but a simple solution to a problem we've seen over the years. When paired with a back panel that has the capability of holding say a hydration bladder or radio, you can simply place the tool inside of the panel. You can then route bungee cords as depicted here through the MOLLE on the kit creating a loop for say a Halligan tool.
Beside that bungee, is another bungee cord specifically for retaining a shotgun for breaching. Sometimes to meet the necesity of properly retaining your equipment you have to create your own solutions instead of waiting for a company to provide one for you.
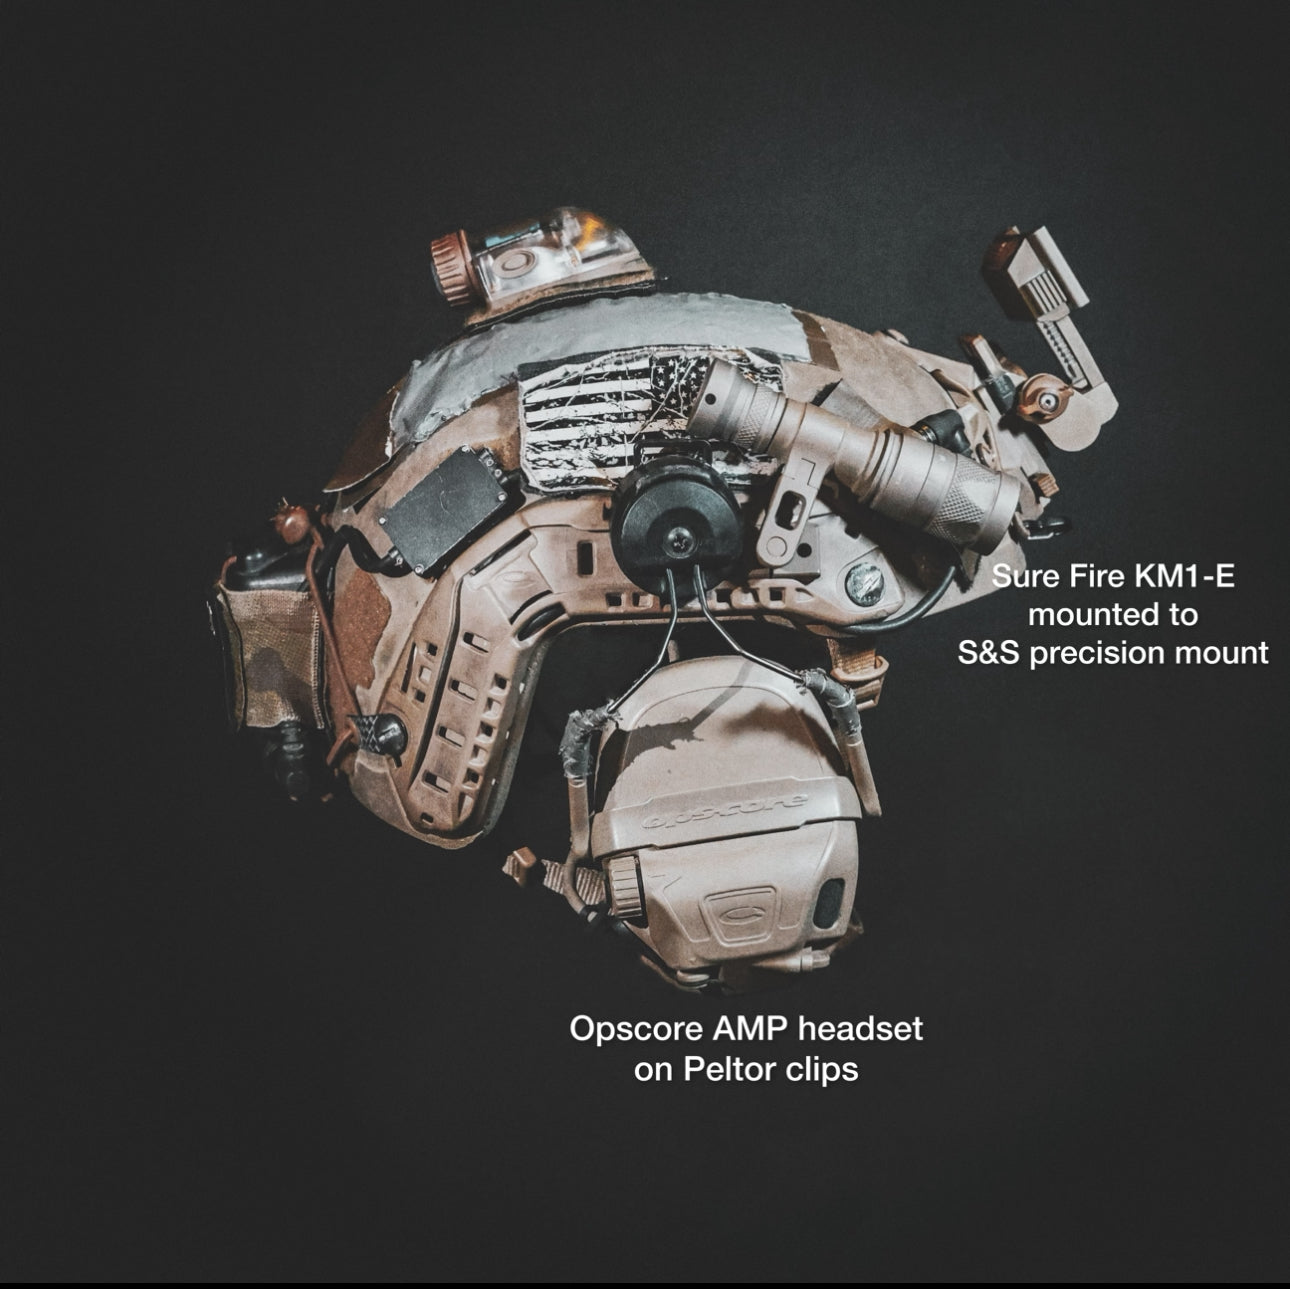
Helmet Setup
A helmet offers a world of opportunities to have multiple tools for the job right at your fingertips. Here on this helmet there's the ability to have multiple forms of light wether it's IR, white light, or anything else you prefer.
Another option you have is the ability to mark your location via IR or visible pulsating or steady strobe.
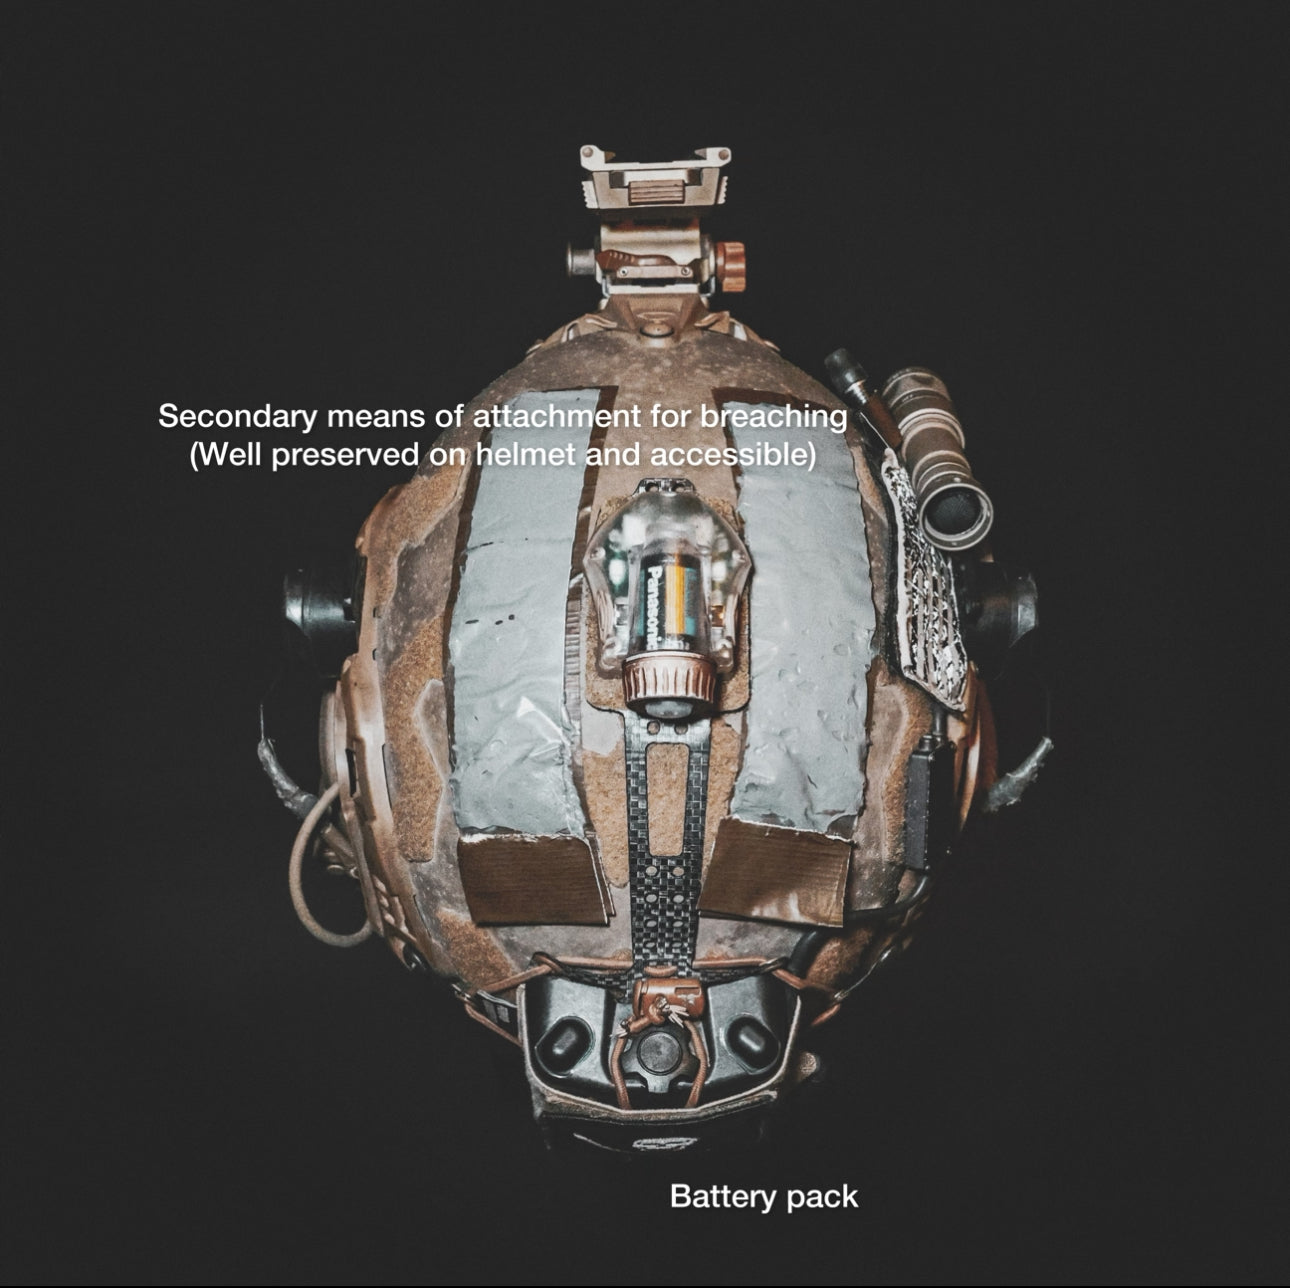
Secondary means of attachment for breaching can conveniently be placed on the top of your helmet. Then of course the obvious, protection from impacts and the ability to mount night vision for night time operations or anything else you can dream up. Below are some pictures showing this particular helmet set up.
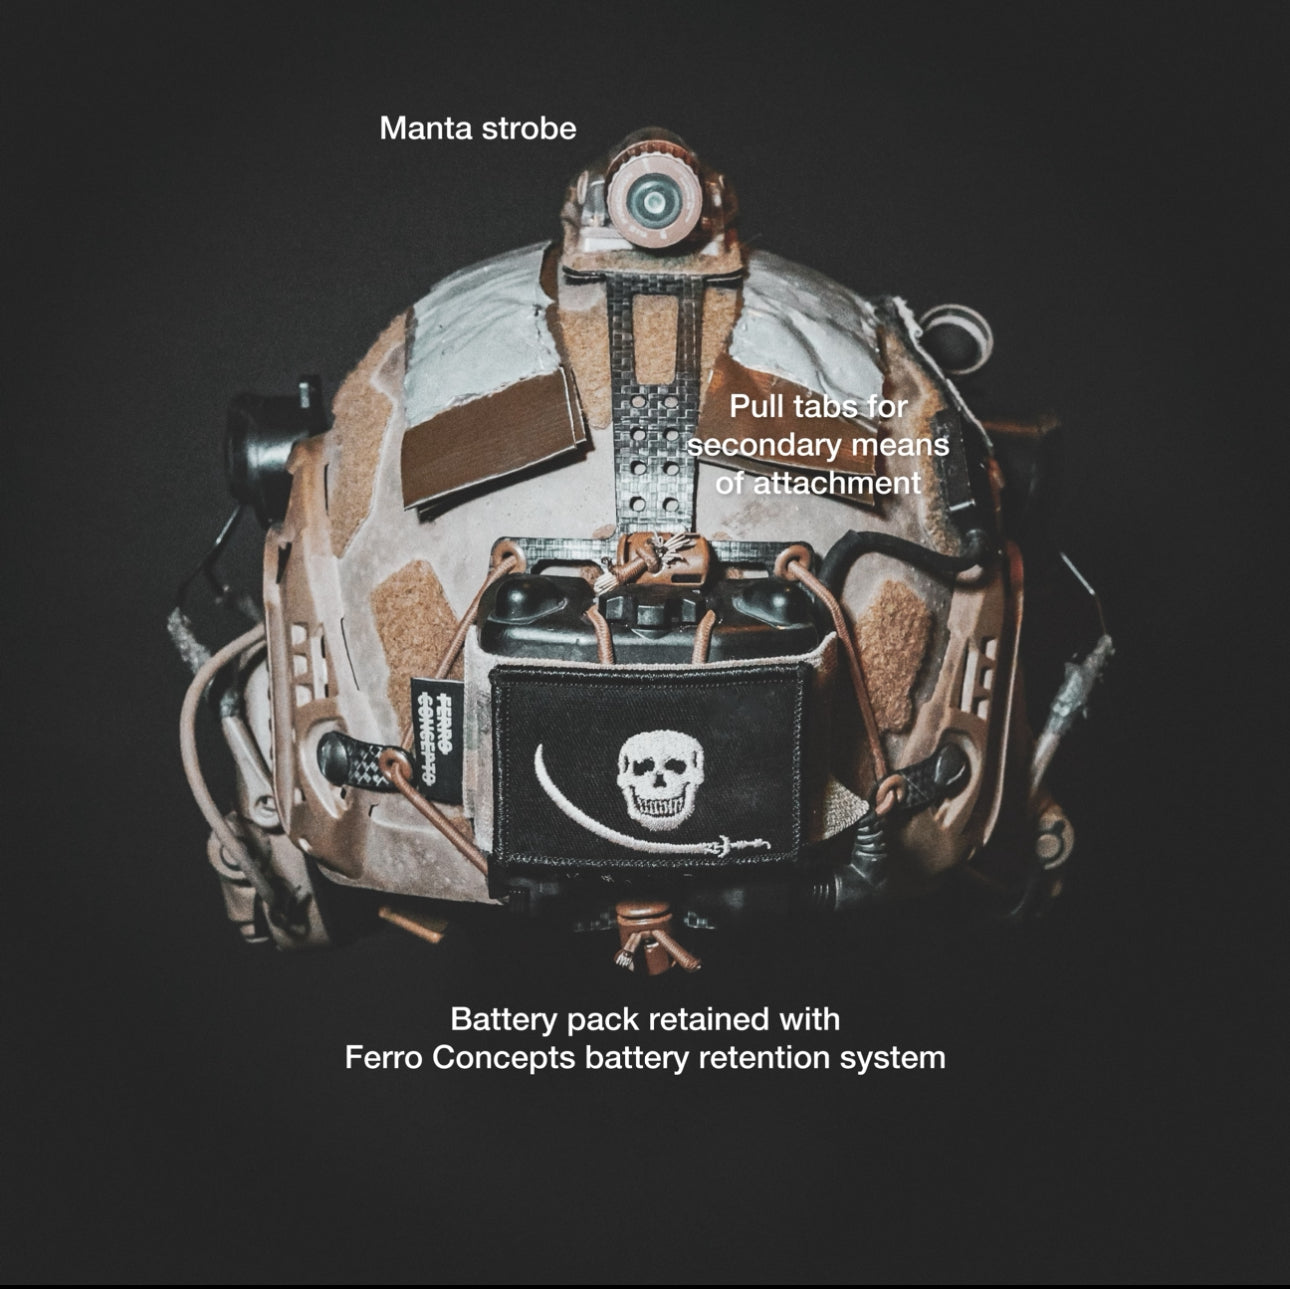
Secondary means of attachment/ Battery retention system
Here you can see two strips on the top of the helmet, those are strips of adhesive (the name of the adhesive will not be mentioned) made for breaching. The way to set this up is to take tape and stick it to your helmet making pull tabs where you'd like to pull the strip from. Next you take your adhesive and remove one side of the protective covering on said adhesive, then simply place the adhesive sticky side down on top of the tape. Once you've done that you can place a pull tab on the remaining protective cover on your adhesive. To employ simply pull the bottom pull tab, separate the top clear protective cover leaving the tape and adhesive to place however you see fit.
Next you see a battery pack for PVS 31A's made by L3
Harris, which gives you the ability to hold up to four more AA batteries extending the life of your night vision. This specific battery pack also offers an IR strobe. This innovative battery retention system seen here is manufactured by Ferro Concepts. This battery pack brings with it cables that need to be managed. There is a simple trick for guys not running a helmet cover that was shown to Crime Company by a follower of the page shown in the next segment.
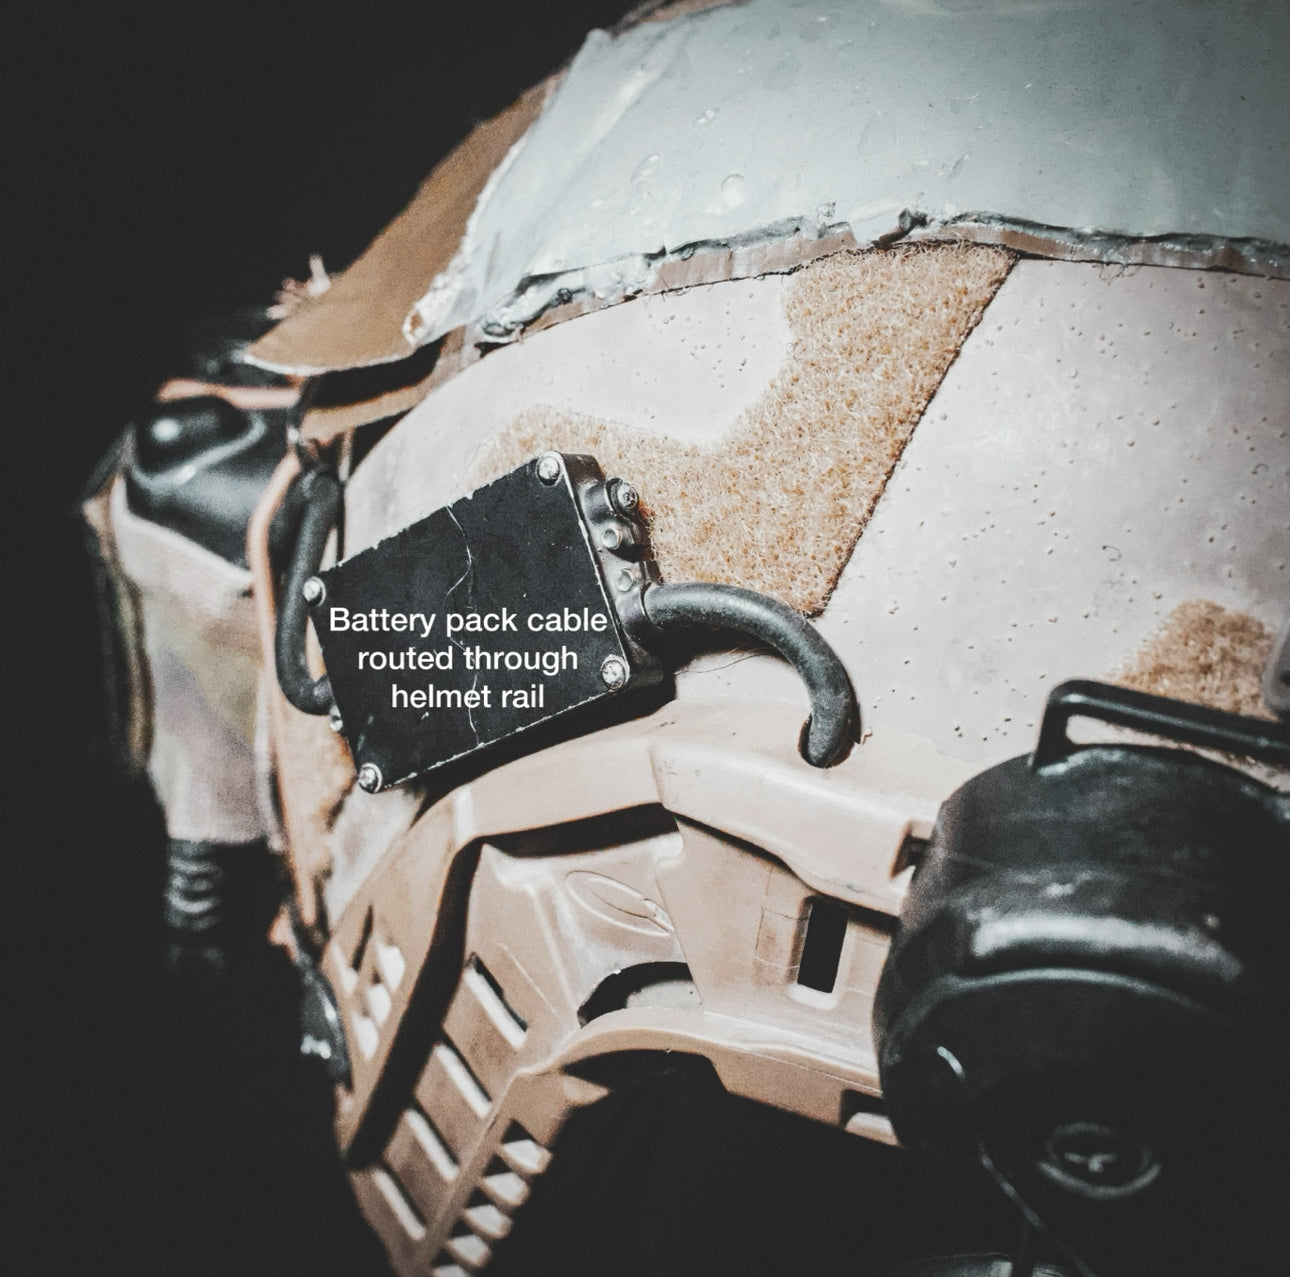
Cable Management
Here you can see the battery cable running into the rail system on the helmet. Inside are a system of channels to route the cable throughout the rail system to ensure the rail can sit properly on the helmet and to provide the preferred length of cable exposed on the other end.
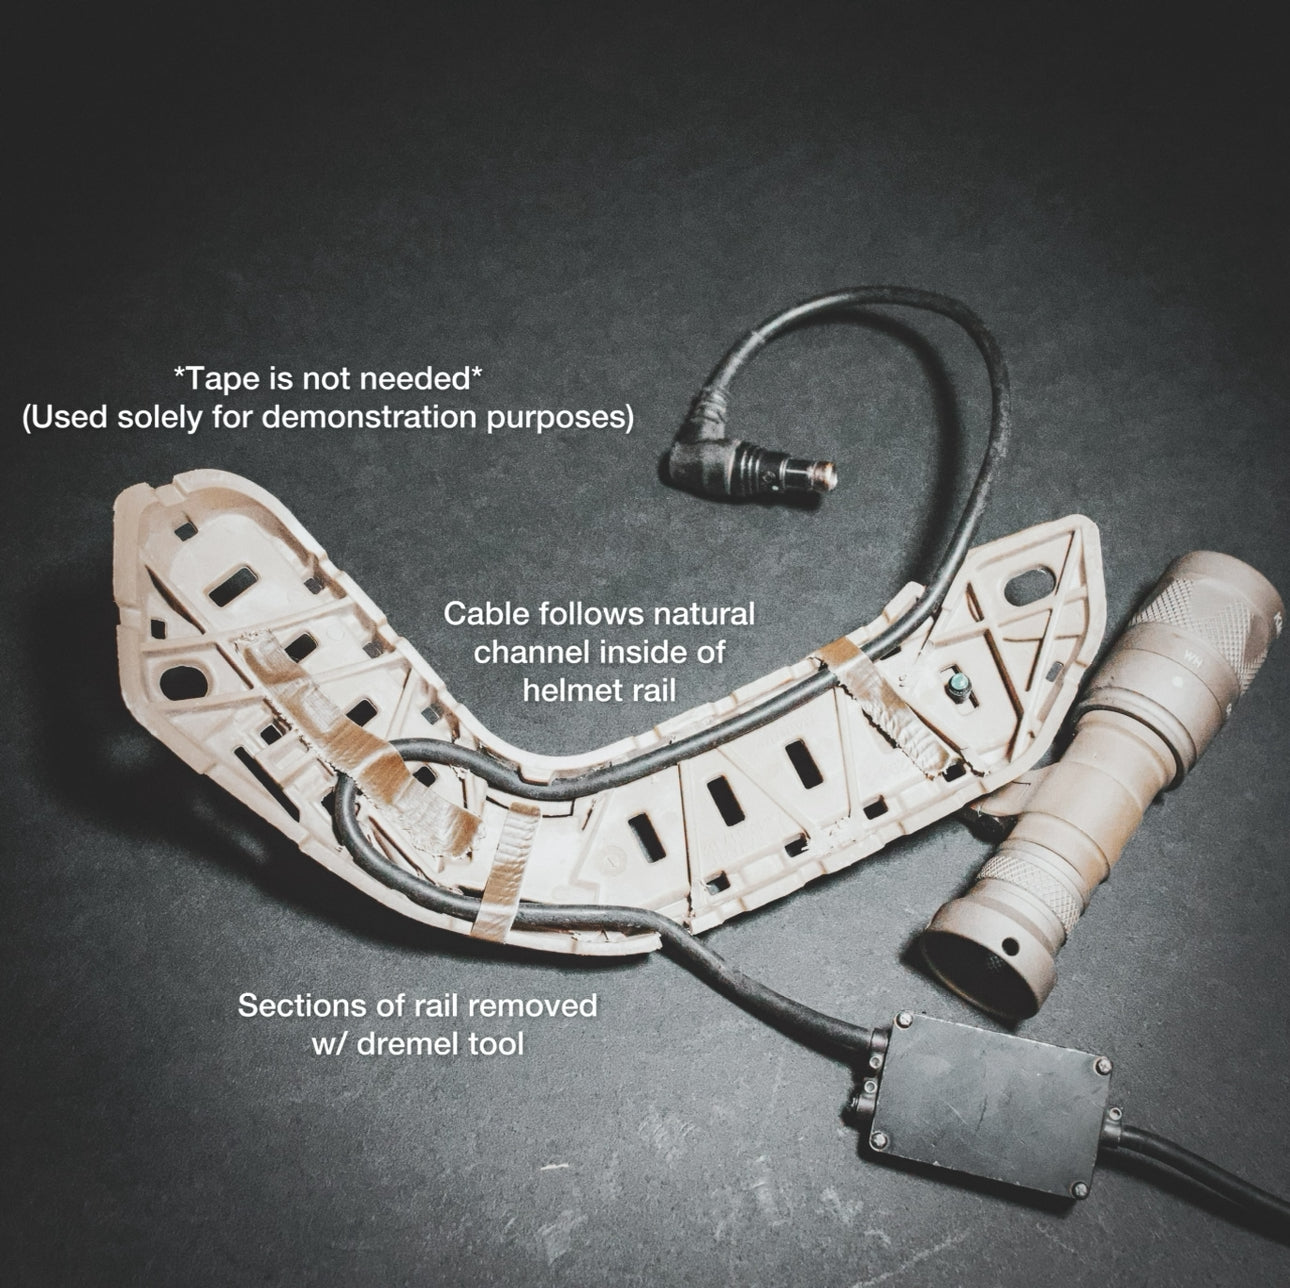
Here you can see how the cable is routed throughout the rail system.
A Dremel tool will make quick work of the polymer rail for the channels. Be sure you consider the thickness in different areas on your rail to prevent drilling through your rail. Tape is not needed once the section is secured to the helmet, because there was no pressure, tape was used solely for demonstration purposes.
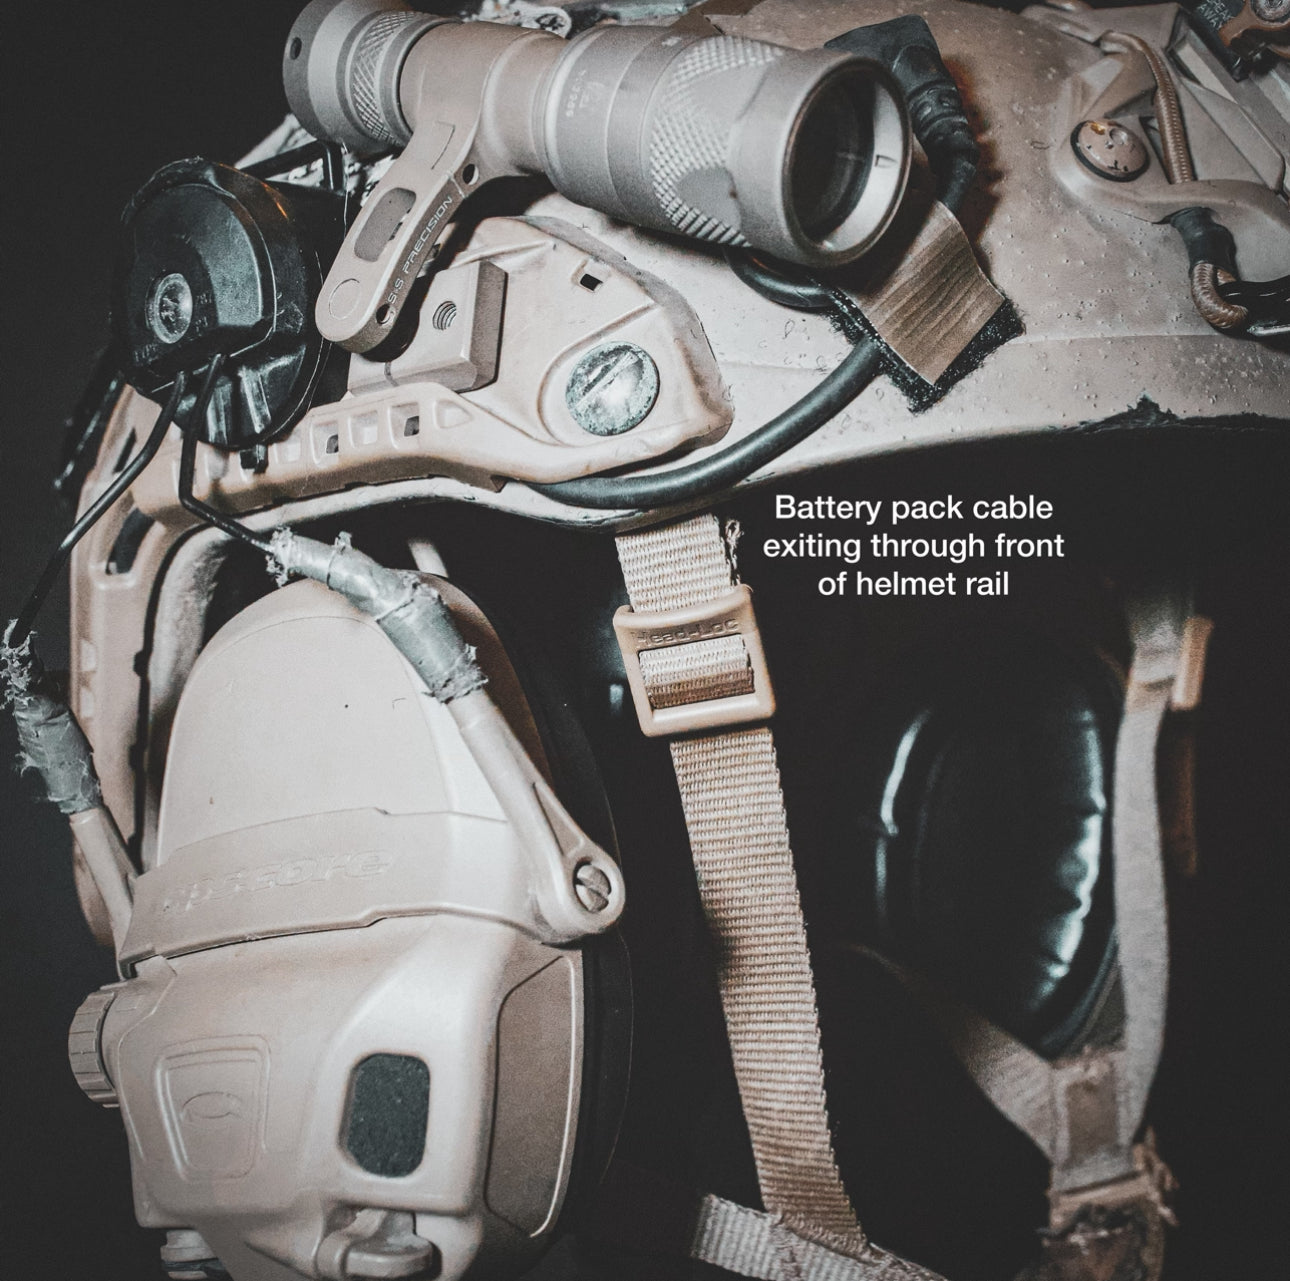
Here you can see where the cable exits the rail system and is simply stowed however you see fit. Simple velcro was used to stow this cable as seen in this picture.
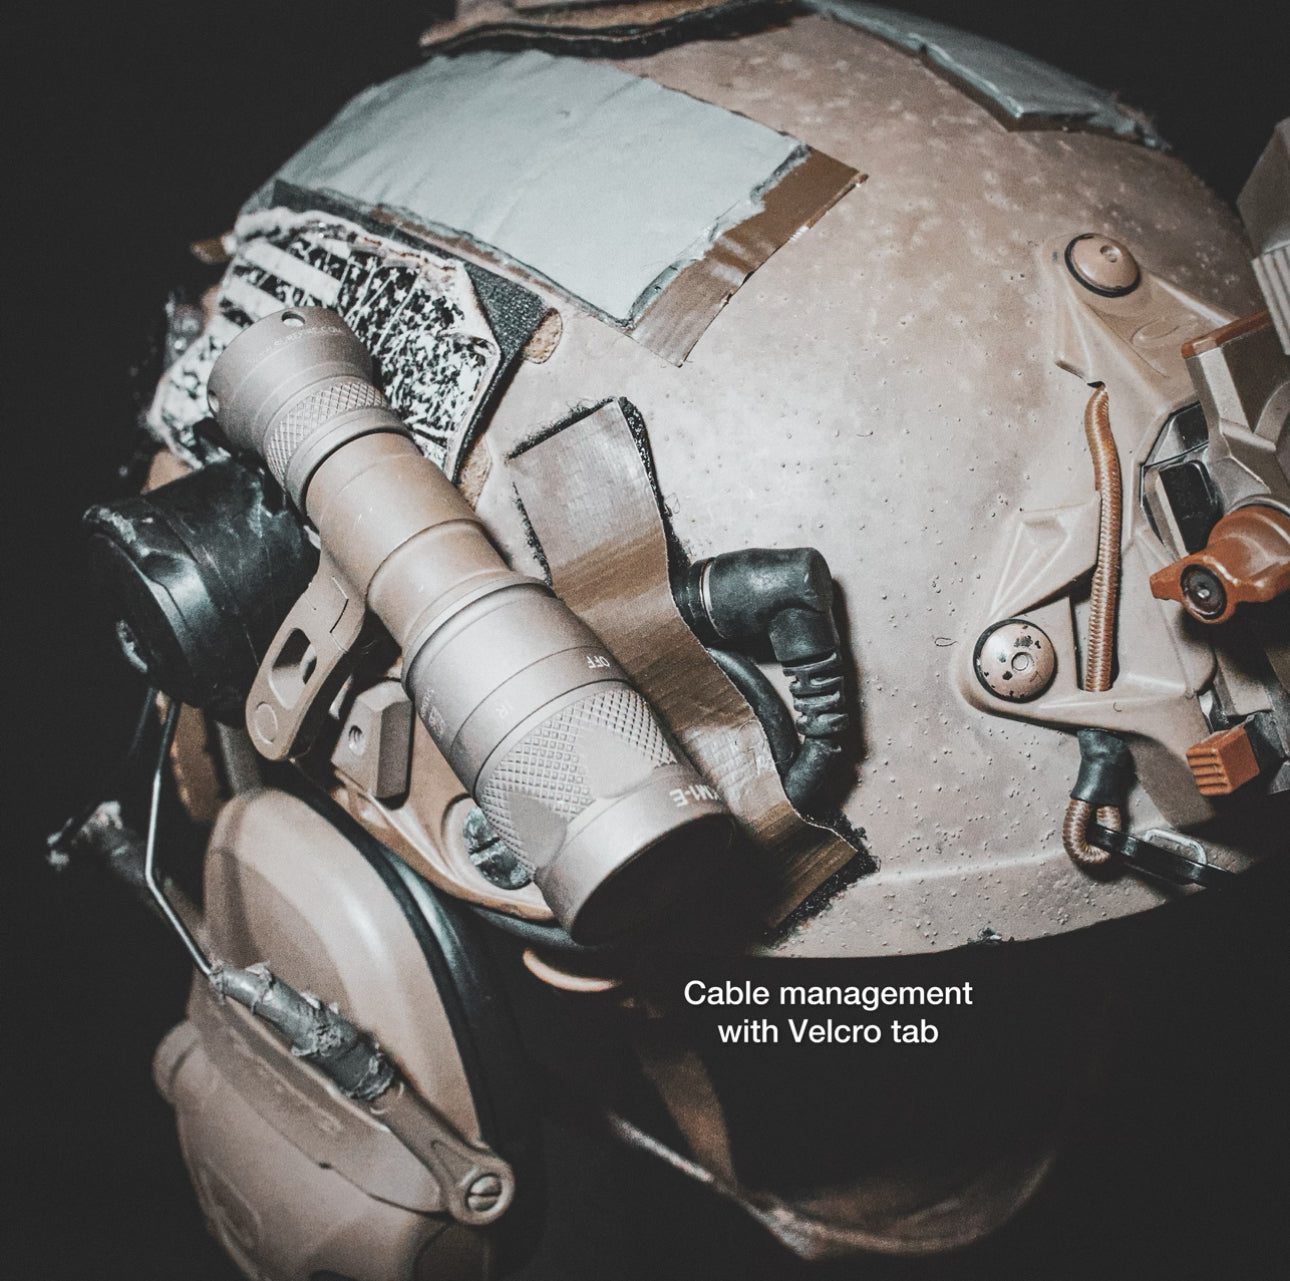
Helmet Mounted Light
Here you see the Sure Fire KM1-E light with a S&S precision mount, mounted to the rail of the helmet. A great tool that can be used simply for night ranges to provide light for anything you may need, to providing ambient light internal of a building for anything you can imagine. This specific mount allows the individual to rotate, turn, and twist the light to any angle to change the placement of the light or use of said light. This specific light offers IR and white light. This individual likely uses another light around their neck for other lights such as a red light. If not they may mount another light with those options on the other side of the helmet.
IR Strobe
Here you have the S&S Precision Manta strobe. This gives you the ability to mark your location via IR or visible pulsating and steady strobe. This specific strobe offers a vibrating signal letting you the user know that the IR setting has in fact been turned on.
Ear Protection
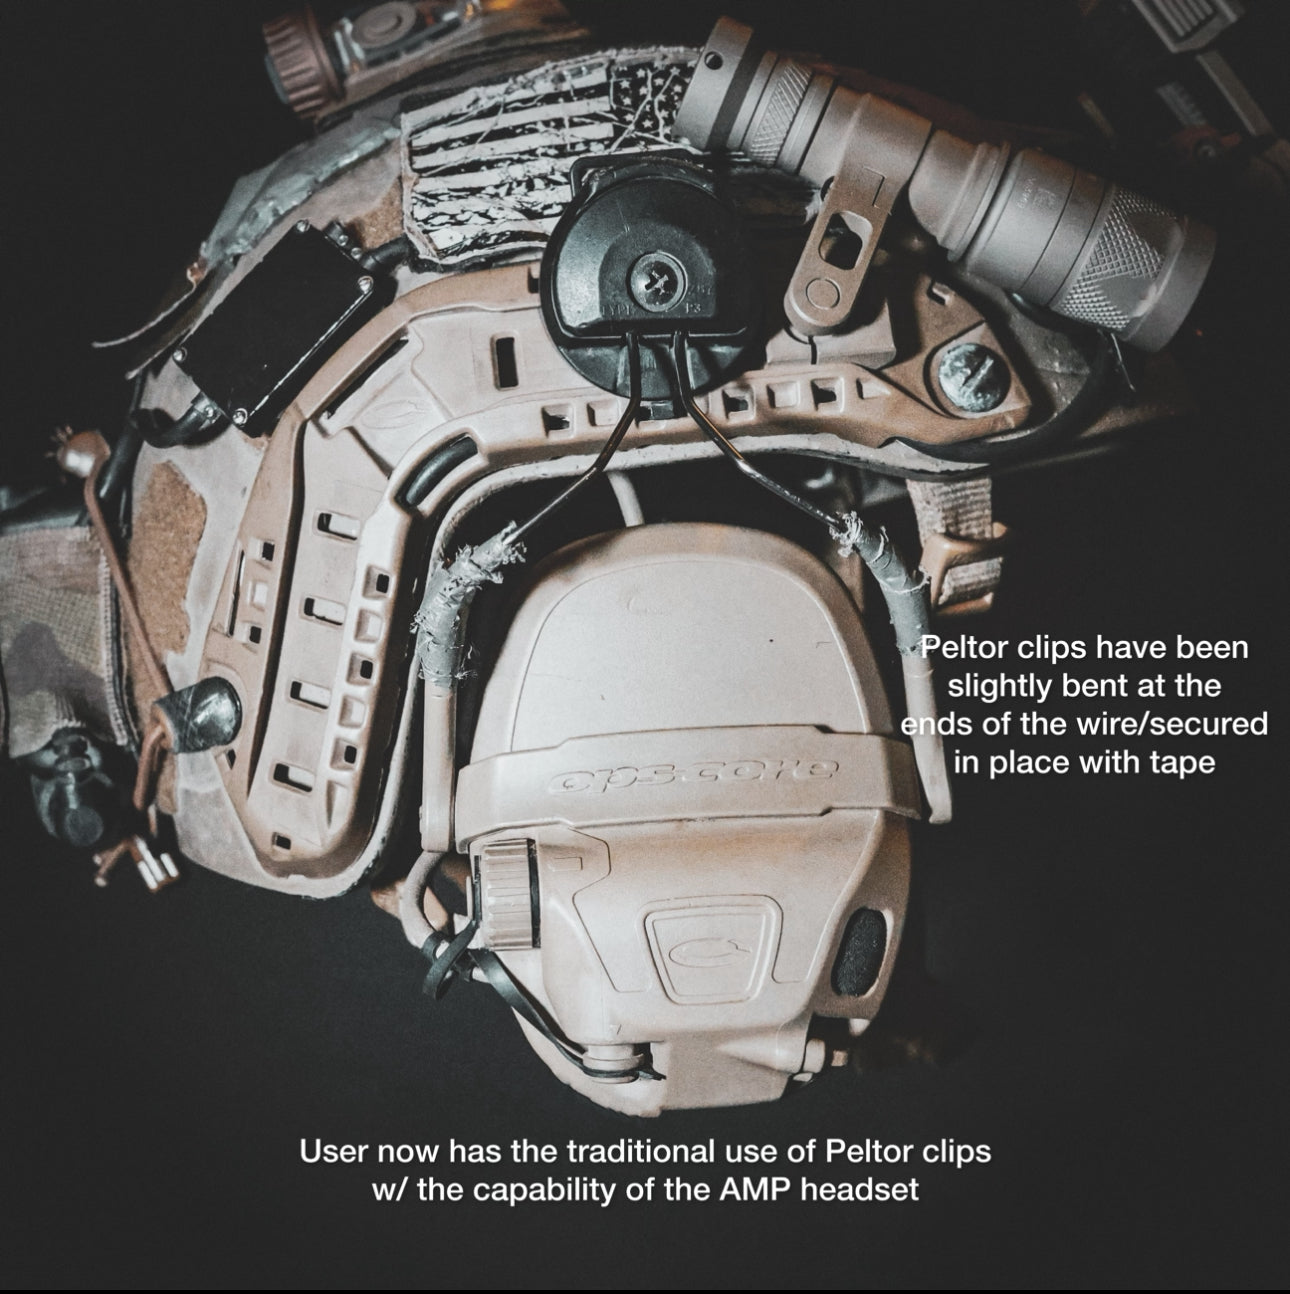
Here is a not so fashionable way of mounting of the OPS-CORE AMP
Headset. If you look back throughout the last 20 years you will see all types of different solutions to issues end users have found with their issued equipment, this is one of those. These particular ear pro have been known to be less than desirable. There are a few companies that have made solutions to this issue however we have all found those solutions to also pose other issues themselves. This individual simply decided to place the OPSCORE ear pro on to old pelter clips and secure them with simple 100mph tape. This individual claims to have had the same tape on his ear pro for two and a half years now with no problems. Yes, before you all say it, he could just used pelters however the OPS-CORE ear pro are significantly more compatible than peltors and have less cables needed.